Migrate Optusnet Email to Outlook, Microsoft 365, and Gmail
Updated On - October 9, 2024 by Armaan | Reading Time: 6 minutes
Email migration is a common task for individuals and businesses looking to switch email service providers or consolidate their communication platforms. For Optusnet Email users, it is a very practical move to migrate data into a more advanced email service such as Outlook, Microsoft 365, and Gmail. This article provides a comprehensive guide on how to migrate Optusnet email to Outlook, Microsoft 365, and Gmail. Additionally, we will cover both manual and automated methods using the Regain Email Migration Tool to ensure a smooth transition.
Reasons to Migrate from Optusnet?
Optusnet is a reliable email service provider. However, it may not offer the extensive features and integrations available in modern email clients like Outlook, Microsoft 365, and Gmail. Moreover, these platforms provide advanced features and filters such as better spam filters, integration with other productivity tools, advanced security features, and larger storage capacities. Users can take advantage of these email platforms by exporting Optusnet Email to Outlook, Office 365, or Gmail.
Pre-Migration Steps to Migrate Optusnet Email
IT Experts suggest performing some pre-migration steps before exporting vital Optusnet data. These steps ensure your data remains safe in case of any unfortunate event. Furthermore, the steps are as follows:
- Backup Your Data: Ensure all your important emails, contacts, and attachments are backed up. This can be done by exporting your Optusnet emails to a local storage or using the Webmail Backup Tool.
- Check Your Internet Connection: A stable and fast internet connection is essential for a smooth migration process, especially if you have a large volume of emails.
- Gather Necessary Credentials: Ensure you have the login details for both your Optusnet account and the new email service account.
- Inform Contacts: Notify your contacts about the upcoming change to avoid any communication gaps.
Method to Migrate Optusnet Email to Outlook
Outlook is a popular email client from Microsoft that offers powerful features for email management, calendars, tasks, and more. This section will explore two practical methods to export your Optusnet Email data to Outlook. Here’s how you can migrate your Optusnet email to Outlook.
Manually Add Optusnet Email in Outlook
The manual method to import Optusnet Email data in Outlook can be very tedious and lengthy. Therefore, with the help of our testing team, we divided the process into 3 major steps.
- Add Optusnet Account to Outlook
- Export Emails from Optusnet
- Import Emails to the New Outlook Account
Now, let’s explore each step in detail.
Step1: Add Optusnet Account to Outlook
- Open Outlook and go to File > Add Account.
- Then, enter your Optusnet email address and click Connect.
- Furthermore, enter your Optusnet email password and click Connect.
- Follow the on-screen instructions to complete the setup.
Step2: Export Emails from Optusnet
- Once your Optusnet account is added to Outlook, select the Optusnet inbox.
- Go to File > Open & Export > Import/Export.
- Additionally, click on the option Export to a file and click Next.
- Select Outlook Data File (.pst) and click Next.
- Choose the Optusnet email folders you want to export and click Next.
- Choose a location to save the PST file and click Finish.
Step3: Import Emails to New Outlook Account
- Add your new Outlook account to the Outlook application using the same steps as adding the Optusnet account.
- Go to File > Open & Export > Import/Export.
- Choose Import from another program or file and click Next.
- Select Outlook Data File (.pst) and click Next.
- Locate the PST file you exported earlier and click Next.
- Finally, choose the folders you want to import and click Finish.
Method to Export Optusnet Email to Microsoft 365
Microsoft 365 (formerly Office 365) is a comprehensive suite of productivity tools, including Outlook, Word, Excel, and more. Migrating your Optusnet email to Microsoft 365 can significantly enhance your email management capabilities. Now, let’s explore the manual method to convert Optusnet to Office 365.
Manually Move Optunest Email to Microsoft 365
The process to add Optusnet email to Microsoft is very similar to migrating Optusnet to Outlook. Additionally, we have divided the solution into three steps.
Step1: Set Up a Microsoft 365 Account
- Sign in to the Microsoft 365 admin center and set up your new email account.
Step2: Export Emails from Optusnet
- Additionally, follow the steps outlined in the manually migrating Optusnet Email to Outlook section to export your emails to a PST file.
Step3: Import Emails to Microsoft 365
- Open Outlook and add your Microsoft 365 account.
- Go to File > Open & Export > Import/Export.
- Choose Import from another program or file and click Next.
- Select Outlook Data File (.pst) and click Next.
- Locate the PST file you exported and click Next.
- Choose the folders to import and click Finish.
Method to Convert Optusnet Email to Gmail
Gmail is a widely used email service from Google. Additionally, it is known for its robust features, integration with other Google services, and extensive storage. Here’s how to manually migrate your Optusnet email to Gmail.
Traditional Way to Migrate Optusnet Data to Gmail
This section will explore the manual steps to add your Optusnet data to a Gmail account. The manual process is lengthy and is not encouraged by IT experts as it can result in data loss. However, our efficient testing team has found a solution and divided it into three major steps to make the process easier for users. Nonetheless, we recommend using the automated method to prevent data loss.
Step1: Add an Optusnet Account to the Gmail
- Log in to your Gmail account.
- Go to Settings (gear icon) > See all settings.
- Navigate to the Accounts and Import tab.
- Under Check mail from other accounts, click Add a mail account.
- Enter your Optusnet email address and click Next.
- Select Import emails from my other account (POP3) and click Next.
- Enter your Optusnet email password, POP server (usually mail.optusnet.com.au), and port (110).
- Additionally, check to Leave a copy of retrieved messages on the server if you want to keep the emails in Optusnet.
- Click Add Account.
Step2: Forward Emails from Optusnet to Gmail
- Log in to your Optusnet account.
- Go to Settings and find the Mail Forwarding option.
- Enter your Gmail address and save the settings.
Step3: Export Contacts
- Log in to your Optusnet account.
- Export your contacts in a CSV file.
- Log in to your Gmail account and go to Google Contacts.
- Click Import and upload the CSV file.
Directly Migrate Optusnet Email to Outlook, Microsoft 365, & Gmail
While handling sensitive data it is always suggested to use reliable software. One such software is the Regain Email Migration Tool. Moreover, it supports various IMAP-enabled email clients such as Gmail, Yahoo, Zoho, Outlook, Yandex, and Office 365, and converts their emails into platforms like Microsoft Office 365, Gmail, Yahoo Mail, and Exchange Server. Additionally, you can use this software to back up Optusnet Email to other file formats.
Free Download100% Secure Buy NowPrice: $99
Steps to Convert Optusnet Data to Outlook, Office 365, or Gmail
- Install and launch the Email Migration Tool as an administrator.
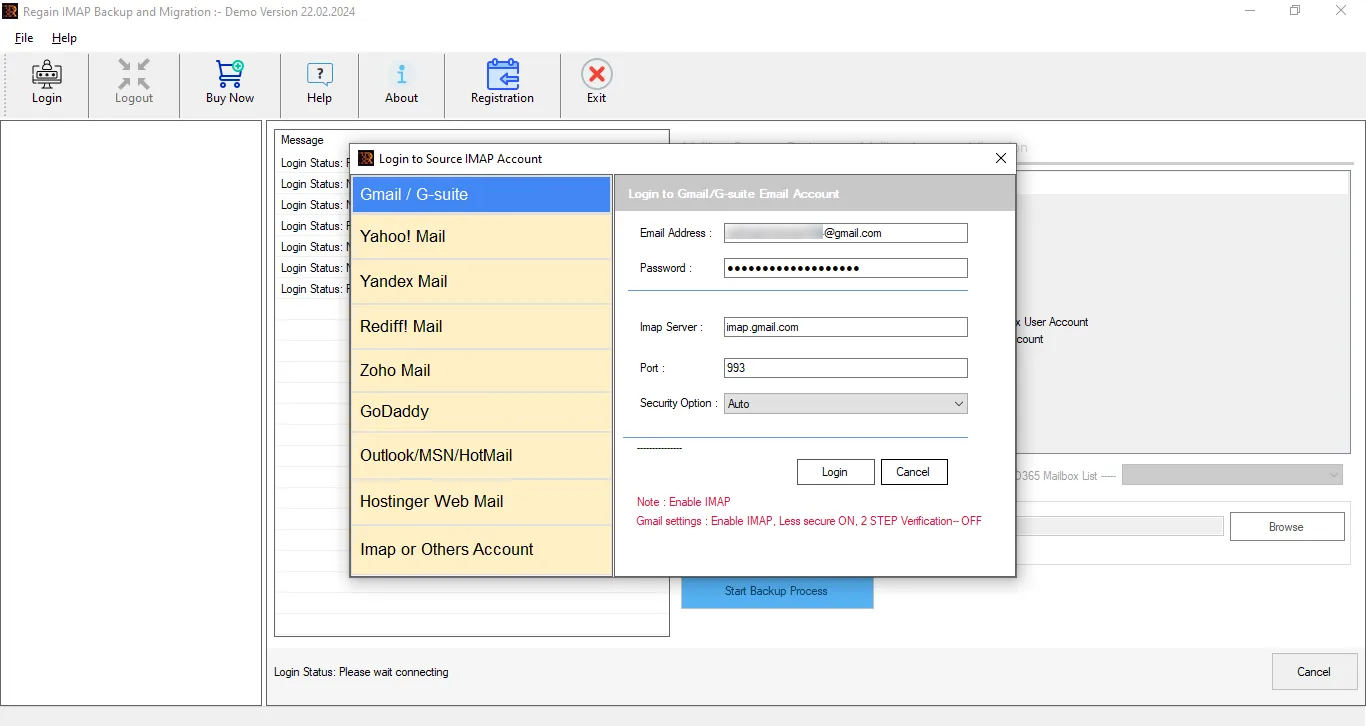
- Choose the option IMAP or Other Accounts and enter the following details:
Email Address: Enter the email address associated with your Optusnet account.
Password: add the Optusnet email account’s password.
Host: mail.optusnet.com.au
Port: 993 - After entering the details click on the Login button to establish a secure connection between Optusnet Email and the software.
- Choose the Desired Files/Folders from the tree-format structure. Additionally, opt for the additional Features and Filters.
- Finally, choose the desired saving format. Then enter the credentials and click on the button Start the Migration Process.
Steps to Perform After Successful Migration
After a user successfully migrates Optusnet email to Outlook, Microsoft 365, and Gmail should follow some post-migration steps. These steps ensure that the migrated data is not lost.
- Verify Data Integrity: Check if all emails, attachments, and contacts have been successfully migrated without any loss.
- Update Email Settings: Update your email settings and configurations in the new email client to ensure proper functioning.
- Notify Contacts: Inform your contacts about your new email address to avoid any communication gaps.
- Test Email Functionality: Send and receive test emails to ensure everything is working correctly in the new email client.
- Monitor for Issues: Keep an eye on your email performance and address any issues promptly to ensure a smooth email experience.
These steps are not mandatory; however, performing them ensures that your experience using the new email provider will be smooth and issue-free.
Conclusion
After you migrate Optusnet email to Outlook, Microsoft 365, and Gmail it can significantly enhance your email management capabilities. Whether you choose to migrate manually or use the Regain IMAP Email Migration Tool, following the steps outlined in this article will help you achieve a smooth and successful transition. By following the sections mentioned in this article you will ensure a smooth migration of your Optusnet Email data.
Related Articles:

